Stablecoins on Sui
Stablecoins are a type of cryptocurrency that are designed to maintain a stable value relative to a fiat currency or a basket of assets. They are widely used for trading, lending, and as a store of value.
Available stablecoins
On Sui, you can interact with various stablecoins such as USDC, USDT, Agora, and Ondo USDY.
USDC (USD Coin)
USDC is a fully collateralized US dollar stablecoin issued by regulated financial institutions. Each USDC token is backed by one US dollar held in reserve. USDC is widely used for trading, payments, and as a stable store of value.
For more detailed information on how to interact with USDC on Sui, refer to the USDC guide.
Site: Circle
USDT (Tether)
USDT, also known as Tether, is one of the oldest and most widely used stablecoins. It is pegged to the US dollar and is backed by a mix of reserves, including cash, cash equivalents, and other assets.
USDT is currently not issued natively on Sui. For more information on bridging USDT to Sui, refer to SUI Bridging.
Site: Tether
Agora
AUSD is a fully collateralized US dollar stablecoin issued by Agora Finance.
Site: Agora Finance
Ondo USDY
USDY is a fully collateralized US dollar stablecoin issued by Ondo Finance, allowing users to earn yield from US Treasury Bills.
Site: Ondo Finance
How to transfer USDC on Sui
USDC provides the ability to transfer dollars over public blockchains using smart contracts. The smart contract allows users to send, receive, and store dollars on chain with a wallet.
Here's a quickstart guide for developers to build an app to perform their first USDC transfer on Sui.
Contract addresses
- Testnet
0xa1ec7fc00a6f40db9693ad1415d0c193ad3906494428cf252621037bd7117e29::usdc::USDC - Mainnet
0xdba34672e30cb065b1f93e3ab55318768fd6fef66c15942c9f7cb846e2f900e7::usdc::USDC
Prerequisites
Before you start building the sample app to perform a USDC transfer, ensure you meet the following prerequisites:
- Node.js and npm: Ensure that you have Node.js and npm installed on your machine. You can download and install Node.js from nodejs.org. npm comes with Node.js.
- Sui Wallet: Install the Sui Wallet browser extension, set up your wallet, and connect it to the appropriate network. Ensure that your wallet is funded with:
- Some SUI tokens to cover transaction fees. (Request Testnet SUI Tokens from the Wallet Settings page)
- USDC tokens for the transfer. (USDC Testnet Faucet)
Installation
To begin, create a new project directory (usdc-transfer-app, for example) and initialize it with pnpm:
pnpm init
To keep a small footprint, the instruction uses Parcel to render the example React-based app. You can use a more robust framework, like Next.js, or a different package manager, but you must modify the steps appropriately.
pnpm add react react-dom parcel
Install Sui dependencies next:
pnpm add @mysten/dapp-kit @mysten/sui @tanstack/react-query
Finally, update your package.json to include the following script:
"scripts": {
    "start": "parcel index.html"
  },
Create site structure
At the root of your project directory, create an index.html file and save the following content to it:
index.html file
index.html file<!DOCTYPE html>
<html lang="en">
<head>
<meta charset="UTF-8" />
<meta name="viewport" content="width=device-width, initial-scale=1.0" />
<title>Sui USDC Sender</title>
<link href="./global.css" rel="stylesheet">
<link rel="icon" href="./favicon.ico" type="image/x-icon" />
</head>
<body>
<div id="root"></div>
<script src="index.js" type="module"></script>
</body>
</html>
Next, create and save an index.js file in the same location with the following code:
index.js file
index.js fileimport React from 'react';
import ReactDOM from 'react-dom';
import { createRoot } from 'react-dom/client';
import App from './App.js';
const root = createRoot(document.getElementById('root'));
root.render(<App tab="home" />);
To style the output for the site, create a global.css file in the root of your project. Copy and paste the following minimal styling into the file and save:
global.css file
global.css file.mainwrapper {
display: flex;
flex-direction: column;
min-height: 100vh;
padding: 6rem;
}
.outerwrapper {
z-index: 10;
width: 100%;
max-width: 64rem;
margin: 0 auto;
justify-content: center;
justify-content: space-between;
font-family: ui-monospace, SFMono-Regular, Menlo, Monaco, Consolas, "Liberation Mono", "Courier New", monospace;
font-size: 0.875rem;
line-height: 1.25rem;
}
.h1 {
font-size: 2.25rem;
line-height: 2.5rem;
font-weight: bold;
margin-bottom: 2rem;
}
.status {
margin-top: 1rem
}
.form {
margin-top: 2rem
}
.input {
padding: 0.5rem;
border-width: 1px;
border-radius: 0.25rem;
margin-right: 0.5rem;
color: black;
}
.connected {
background-color: rgb(191 219 254);
color: black;
}
.connected:hover {
background-color: rgb(147 197 253);
}
.notconnected {
background-color: rgb(209 213 219);
color: rgb(107 114 128);
}
.transition {
padding: 0.5rem;
border-radius: 0.25rem;
transition-property: color, background-color, border-color, text-decoration-color, fill, stroke;
transition-timing-function: cubic-bezier(0.4, 0, 0.2, 1);
transition-duration: 150ms;
transition-duration: 200ms;
}
Finally, create an App.js file at the project root. When complete, this file will hold the logic for the USDC transfer. For now, just create the file to display some basic text. This example does not use TypeScript to keep the instruction focused, but you can certainly use it in your own projects.
App.js file
App.js fileimport React from 'react';
function App() {
return (
<div>
<h1>Hello, World!</h1>
<p>This is a minimal React app.</p>
</div>
);
}
export default App;
Start the development server to make sure the default app runs using the following command in the root of your project:
pnpm start
Open a browser to localhost:1234 to make sure the Hello World text appears.
Import code and setup
Open the App.js file and make the changes that follow.
First, import necessary libraries and set up the network configuration.
import React, { useState, useEffect } from "react";
import {
  createNetworkConfig,
  SuiClientProvider,
  useSuiClient,
  ConnectButton,
  useCurrentAccount,
  useSignAndExecuteTransaction,
  WalletProvider,
} from "@mysten/dapp-kit";
import { Transaction } from "@mysten/sui/transactions";
import { getFullnodeUrl } from "@mysten/sui/client";
import { QueryClient, QueryClientProvider } from "@tanstack/react-query";
import { useState } from "react";
import "@mysten/dapp-kit/dist/index.css";
This component handles the main functionality of the application, including wallet connection, defining token, and token transfer.
Define USDC Testnet token contract
// Define the USDC token type on Sui Testnet
// This is the unique identifier for the USDC token on Sui
const USDC_TYPE = '0xa1ec7fc00a6f40db9693ad1415d0c193ad3906494428cf252621037bd7117e29::usdc::USDC';
State management
Create a HomeContent() function that is going to be responsible for setting up and displaying the UI. At the top of this function, define state variables to manage the connection status, amount, recipient address, and transaction status.
// Use the wallet kit to get the current account and transaction signing function
const currentAccount = useCurrentAccount();
const { mutate: signAndExecuteTransaction } = useSignAndExecuteTransaction();
// Get the Sui client for interacting with the Sui network
const suiClient = useSuiClient();
const [open, setOpen] = useState(false);
const [connected, setConnected] = useState(false);
const [amount, setAmount] = useState("");
const [recipientAddress, setRecipientAddress] = useState("");
const [txStatus, setTxStatus] = useState("");
Effect Hook for Connection Status
Use useEffect to update the connection status whenever the currentAccount value changes.
useEffect(() => {
  setConnected(!!currentAccount);
}, [currentAccount]);
Token sending logic
Define the function to handle sending tokens, including validation and transaction execution.
const handleSendTokens = async () => {
  if (!currentAccount || !amount || !recipientAddress) {
    setTxStatus("Please connect wallet and fill in all fields");
    return;
  }
  try {
    // Fetch USDC coins owned by the current account
    // This uses the SuiClient to get coins of the specified type owned by the current address
    const { data: coins } = await suiClient.getCoins({
      owner: currentAccount.address,
      coinType: USDC_TYPE,
    });
    if (coins.length === 0) {
      setTxStatus("No USDC coins found in your wallet");
      return;
    }
    // Create a new transaction block
    // Transaction is used to construct and execute transactions on Sui
    const tx = new Transaction();
    // Convert amount to smallest unit (6 decimals)
    const amountInSmallestUnit = BigInt(parseFloat(amount) * 1_000_000);
    // Split the coin and get a new coin with the specified amount
    // This creates a new coin object with the desired amount to be transferred
    const [coin] = tx.splitCoins(coins[0].coinObjectId, [
      tx.pure.u64(amountInSmallestUnit),
    ]);
    // Transfer the split coin to the recipient
    // This adds a transfer operation to the transaction block
    tx.transferObjects([coin], tx.pure.address(recipientAddress));
    // Sign and execute the transaction block
    // This sends the transaction to the network and waits for it to be executed
    const result = await signAndExecuteTransaction(
      {
        transaction: tx,
      },
      {
        onSuccess: (result) => {
          console.log("Transaction result:", result);
          setTxStatus(`Transaction successful. Digest: ${result.digest}`);
        },
      }
    );
  } catch (error) {
    console.error("Error sending tokens:", error);
    setTxStatus(
      `Error: ${error instanceof Error ? error.message : "Unknown error"}`
    );
  }
};
Rendering the UI
Render the main UI components, including input fields for amount and recipient address, and a button to send tokens.
return (
  <main className="mainwrapper">
    <div className="outerwrapper">
      <h1 className="h1">Sui USDC Sender (Testnet)</h1>
      <ConnectButton />
      {connected && currentAccount && (
        <p className="status">Connected: {currentAccount.address}</p>
      )}
      <div className="form">
        <input
          type="text"
          placeholder="Amount (in USDC)"
          value={amount}
          onChange={(e) => setAmount(e.target.value)}
          className="input"
        />
        <input
          type="text"
          placeholder="Recipient Address"
          value={recipientAddress}
          onChange={(e) => setRecipientAddress(e.target.value)}
          className="input"
        />
        <button
          onClick={handleSendTokens}
          disabled={!connected}
          className={`${
            connected && amount && recipientAddress
              ? "connected"
              : "notconnected"
          } transition`}
        >
          Send USDC
        </button>
      </div>
      {txStatus && <p className="status">{txStatus}</p>}
    </div>
  </main>
);
Complete HomeContent function
After adding the UI components, your HomeContent() function is complete. Continue to the next section to add the function to the main application component.
Complete HomeContent() function
HomeContent() functionfunction HomeContent() {
// Use the wallet kit to get the current account and transaction signing function
const currentAccount = useCurrentAccount();
const { mutate: signAndExecuteTransaction } = useSignAndExecuteTransaction();
// Get the Sui client for interacting with the Sui network
const suiClient = useSuiClient();
const [open, setOpen] = useState(false);
const [connected, setConnected] = useState(false);
const [amount, setAmount] = useState("");
const [recipientAddress, setRecipientAddress] = useState("");
const [txStatus, setTxStatus] = useState("");
useEffect(() => {
setConnected(!!currentAccount);
}, [currentAccount]);
const handleSendTokens = async () => {
if (!currentAccount || !amount || !recipientAddress) {
setTxStatus("Please connect wallet and fill in all fields");
return;
}
try {
// Fetch USDC coins owned by the current account
// This uses the SuiClient to get coins of the specified type owned by the current address
const { data: coins } = await suiClient.getCoins({
owner: currentAccount.address,
coinType: USDC_TYPE,
});
if (coins.length === 0) {
setTxStatus("No USDC coins found in your wallet");
return;
}
// Create a new transaction block
// Transaction is used to construct and execute transactions on Sui
const tx = new Transaction();
// Convert amount to smallest unit (6 decimals)
const amountInSmallestUnit = BigInt(parseFloat(amount) * 1_000_000);
// Split the coin and get a new coin with the specified amount
// This creates a new coin object with the desired amount to be transferred
const [coin] = tx.splitCoins(coins[0].coinObjectId, [
tx.pure.u64(amountInSmallestUnit),
]);
// Transfer the split coin to the recipient
// This adds a transfer operation to the transaction block
tx.transferObjects([coin], tx.pure.address(recipientAddress));
// Sign and execute the transaction block
// This sends the transaction to the network and waits for it to be executed
const result = await signAndExecuteTransaction(
{
transaction: tx,
},
{
onSuccess: (result) => {
console.log("Transaction result:", result);
setTxStatus(`Transaction successful. Digest: ${result.digest}`);
},
}
);
} catch (error) {
console.error("Error sending tokens:", error);
setTxStatus(
`Error: ${error instanceof Error ? error.message : "Unknown error"}`
);
}
};
return (
<main className="mainwrapper">
<div className="outerwrapper">
<h1 className="h1">Sui USDC Sender (Testnet)</h1>
<ConnectButton />
{connected && currentAccount && (
<p className="status">Connected: {currentAccount.address}</p>
)}
<div className="form">
<input
type="text"
placeholder="Amount (in USDC)"
value={amount}
onChange={(e) => setAmount(e.target.value)}
className="input"
/>
<input
type="text"
placeholder="Recipient Address"
value={recipientAddress}
onChange={(e) => setRecipientAddress(e.target.value)}
className="input"
/>
<button
onClick={handleSendTokens}
disabled={!connected}
className={`${
connected && amount && recipientAddress
? "connected"
: "notconnected"
} transition`}
>
Send USDC
</button>
</div>
{txStatus && <p className="status">{txStatus}</p>}
</div>
</main>
);
}
Main application component
This component wraps the HomeContent() with necessary providers for state management and wallet connection.
function App() {
  return (
    <QueryClientProvider client={queryClient}>
      <SuiClientProvider networks={networkConfig} defaultNetwork="testnet">
        <WalletProvider>
          <HomeContent />
        </WalletProvider>
      </SuiClientProvider>
    </QueryClientProvider>
  );
}
Save your App.js file and run pnpm start from your project root to start the development server (if not already running).
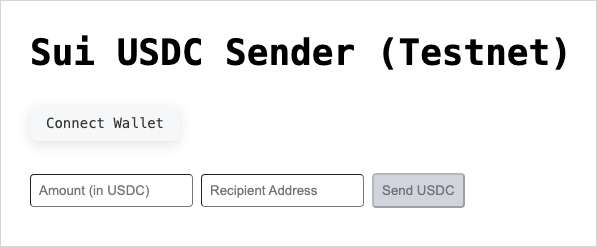
Open http://localhost:1234 in your browser. Your UI should display and look similar to the following:
Complete code for App.js
App.jsimport React, { useState, useEffect } from "react";
import {
createNetworkConfig,
SuiClientProvider,
useSuiClient,
ConnectButton,
useCurrentAccount,
useSignAndExecuteTransaction,
WalletProvider,
} from "@mysten/dapp-kit";
import { Transaction } from "@mysten/sui/transactions";
import { getFullnodeUrl } from "@mysten/sui/client";
import { QueryClient, QueryClientProvider } from "@tanstack/react-query";
import { useState } from "react";
import "@mysten/dapp-kit/dist/index.css";
const { networkConfig } = createNetworkConfig({
testnet: {
url: getFullnodeUrl("testnet"),
},
mainnet: {
url: getFullnodeUrl("mainnet"),
},
});
const queryClient = new QueryClient();
const USDC_TYPE = '0xa1ec7fc00a6f40db9693ad1415d0c193ad3906494428cf252621037bd7117e29::usdc::USDC';
function HomeContent() {
const currentAccount = useCurrentAccount();
const { mutate: signAndExecuteTransaction } = useSignAndExecuteTransaction();
const suiClient = useSuiClient();
const [open, setOpen] = useState(false);
const [connected, setConnected] = useState(false);
const [amount, setAmount] = useState("");
const [recipientAddress, setRecipientAddress] = useState("");
const [txStatus, setTxStatus] = useState("");
useEffect(() => {
setConnected(!!currentAccount);
}, [currentAccount]);
const handleSendTokens = async () => {
if (!currentAccount || !amount || !recipientAddress) {
setTxStatus("Please connect wallet and fill in all fields");
return;
}
try {
const { data: coins } = await suiClient.getCoins({
owner: currentAccount.address,
coinType: USDC_TYPE,
});
if (coins.length === 0) {
setTxStatus("No USDC coins found in your wallet");
return;
}
const tx = new Transaction();
const amountInSmallestUnit = BigInt(parseFloat(amount) * 1_000_000);
const [coin] = tx.splitCoins(coins[0].coinObjectId, [
tx.pure.u64(amountInSmallestUnit),
]);
tx.transferObjects([coin], tx.pure.address(recipientAddress));
const result = await signAndExecuteTransaction(
{
transaction: tx,
},
{
onSuccess: (result) => {
console.log("Transaction result:", result);
setTxStatus(`Transaction successful. Digest: ${result.digest}`);
},
}
);
} catch (error) {
console.error("Error sending tokens:", error);
setTxStatus(
`Error: ${error instanceof Error ? error.message : "Unknown error"}`
);
}
};
return (
<main className="mainwrapper">
<div className="outerwrapper">
<h1 className="h1">Sui USDC Sender (Testnet)</h1>
<ConnectButton />
{connected && currentAccount && (
<p className="status">Connected: {currentAccount.address}</p>
)}
<div className="form">
<input
type="text"
placeholder="Amount (in USDC)"
value={amount}
onChange={(e) => setAmount(e.target.value)}
className="input"
/>
<input
type="text"
placeholder="Recipient Address"
value={recipientAddress}
onChange={(e) => setRecipientAddress(e.target.value)}
className="input"
/>
<button
onClick={handleSendTokens}
disabled={!connected}
className={`${
connected && amount && recipientAddress
? "connected"
: "notconnected"
} transition`}
>
Send USDC
</button>
</div>
{txStatus && <p className="status">{txStatus}</p>}
</div>
</main>
);
}
function App() {
return (
<QueryClientProvider client={queryClient}>
<SuiClientProvider networks={networkConfig} defaultNetwork="testnet">
<WalletProvider>
<HomeContent />
</WalletProvider>
</SuiClientProvider>
</QueryClientProvider>
);
}
export default App;
Connecting your wallet
To connect your wallet:
- On the USDC Token Sender app, click the Connect Wallet button.
- Select your wallet from the list of available options.
- Approve the connection in your wallet extension.
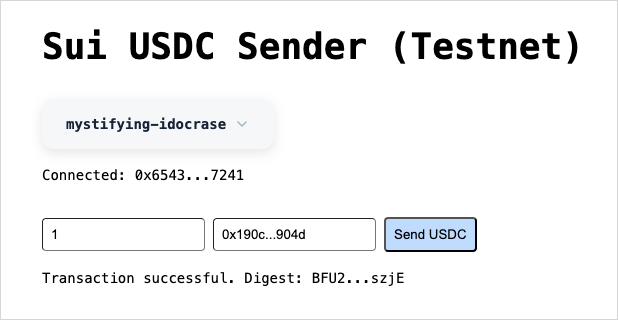
Performing a USDC transfer
Follow these steps to perform a USDC transfer:
- Ensure you have USDC tokens in your wallet. You can get Testnet tokens from Circle's faucet if needed.
- Click the Request Testnet SUI Tokens button from your Sui Wallet to source gas tokens. The button is visible only when your wallet is connected to Testnet.
- In the app, enter the amount of USDC you want to send and the recipient address.
- Click the Send Tokens button.
- Your wallet prompts you to approve the transaction. Review the details and confirm.
- Wait for the transaction to be processed. The app displays the transaction status. A successful transaction looks like the following:
Related links
- Regulated Coin and Deny List: Create a regulated coin and add or remove names from the deny list.
- Loyalty Token: Create a token to reward user loyalty.
- In-Game Token: Create tokens that can be used only within a mobile game.